Using Markers
Markers allow you to read precise values at specific frequencies. The NanoVNA-H supports up to 8 markers (hardware dependent), each displaying frequency and measurement values.
Enable Markers
Section titled “Enable Markers”- Tap the screen to open the menu
- Navigate to
MARKER - Tap
SELECT MARKERand choose a marker (1-8) - The selected marker becomes active and visible
Position Markers
Section titled “Position Markers”Using Touch Screen
Section titled “Using Touch Screen”- Ensure the desired marker is selected (active)
- Tap directly on the trace where you want the marker
- The marker moves to the nearest sweep point
Using Menu
Section titled “Using Menu”- Go to
MARKER > SELECT MARKERand choose a marker - Return to
MARKERmenu - Use
MARKER FREQto enter an exact frequency - Enter the frequency value and tap the appropriate unit
Marker Readout
Section titled “Marker Readout”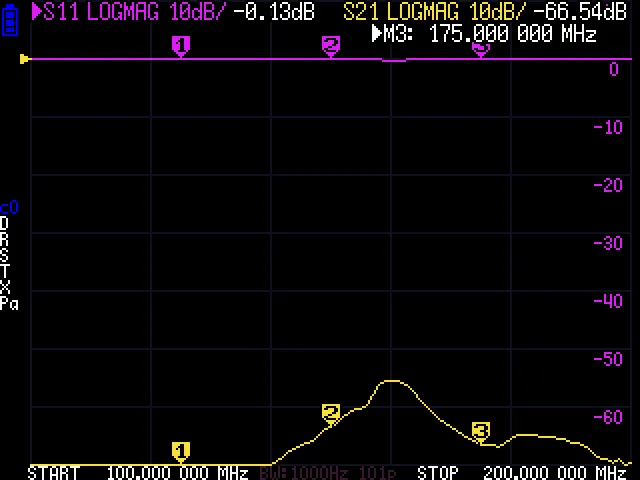
When markers are active, the screen displays:
- Frequency: The marker position in Hz/kHz/MHz
- Primary value: Depends on the trace format (dB, degrees, ohms, etc.)
- Secondary values: Additional parameters like R+jX for Smith chart
The marker info panel shows all enabled markers with their current readings.
Select Active Marker
Section titled “Select Active Marker”- Go to
MARKER > SELECT MARKER - Tap the marker number (1-8) to make it active
- The active marker is highlighted in the marker panel
The active marker determines which marker moves when you tap the screen or enter a frequency.
Disable Markers
Section titled “Disable Markers”To hide a marker:
- Go to
MARKER > SELECT MARKER - Tap the marker you want to disable
- Tap
MARKER OFFto hide it
Or use ALL OFF to disable all markers at once.
Marker Operations
Section titled “Marker Operations”Set Marker to Center
Section titled “Set Marker to Center”- Position marker at the frequency of interest
- Go to
MARKER > MARKER->CENTER - The sweep center frequency moves to the marker position
Set Marker to Span Start/Stop
Section titled “Set Marker to Span Start/Stop”MARKER->START: Sets sweep start to marker frequencyMARKER->STOP: Sets sweep stop to marker frequency
Shell Commands
Section titled “Shell Commands”# Enable marker n at index positionmarker n onmarker n {index}
# Disable markermarker n off
# Enable all markersmarker on
# Disable all markersmarker off
# Examples:marker 1 on # Enable marker 1marker 2 100 # Enable marker 2 at sweep point 100marker 3 off # Disable marker 3Marker Display Format
Section titled “Marker Display Format”The marker readout format depends on the trace type:
| Trace Format | Marker Shows |
|---|---|
| LogMag | dB value |
| Phase | Degrees |
| SWR | Ratio (e.g., 1.5:1) |
| Smith | R + jX ohms |
| Delay | Seconds |
| Impedance | Ohms |
For Smith chart traces, the marker can show additional formats (see Smith Marker Formats guide).
Marker Precision
Section titled “Marker Precision”Markers snap to the nearest sweep point — they cannot land between points. This means marker frequency accuracy depends on your sweep configuration:
| Sweep Range | Points | Frequency Resolution |
|---|---|---|
| 100–200 MHz | 101 | 1.0 MHz per point |
| 100–200 MHz | 401 | 0.25 MHz per point |
| 140–150 MHz | 101 | 100 kHz per point |
| 144–148 MHz | 101 | 40 kHz per point |
For precise frequency readings, narrow the sweep range around the frequency of interest. The NanoVNA-H4’s 401 points gives four times finer resolution than the NanoVNA-H’s 101 points.
Multiple Marker Strategies
Section titled “Multiple Marker Strategies”Use multiple markers for comparative measurements:
Bandwidth Measurement
Section titled “Bandwidth Measurement”- Marker 1 at the passband center (minimum S11 or maximum S21)
- Markers 2 and 3 at the -3 dB points on each side
- Read bandwidth as the frequency difference between markers 2 and 3
Filter Shape Factor
Section titled “Filter Shape Factor”- Markers 1-2 at the -3 dB bandwidth edges
- Markers 3-4 at the -60 dB points
- Shape factor = (-60 dB bandwidth) / (-3 dB bandwidth)
Antenna Comparison
Section titled “Antenna Comparison”- Place markers at key operating frequencies (e.g., 144.0, 145.0, 146.0, 148.0 MHz)
- Read SWR at each point simultaneously
- Compare before and after adjustments without repositioning
Markers Across Trace Formats
Section titled “Markers Across Trace Formats”When multiple traces are active, a single marker reads values from every enabled trace simultaneously. The marker readout panel shows all values stacked:
| Trace | Marker Shows |
|---|---|
| S11 LogMag | Return loss in dB |
| S11 Smith | R + jX in ohms |
| S21 LogMag | Insertion loss in dB |
| S21 Phase | Phase shift in degrees |
This is one of the NanoVNA’s most useful features — you can see impedance, return loss, and insertion loss at the same frequency without switching views.
Lever Mode
Section titled “Lever Mode”When lever mode is set to MARKER (default), the hardware jog wheel moves the active marker position. Turn the wheel to step through sweep points one at a time. Change the lever mode via CONFIG > LEVER MODE:
| Mode | Jog Wheel Controls |
|---|---|
| MARKER | Active marker position |
| SPARAMETER | Not used (reserved) |
| CALIBRATE | Not used (reserved) |
Marker Tracking
Section titled “Marker Tracking”The active marker tracks across sweeps, maintaining its frequency position as data updates. This is useful for:
- Tuning antennas in real-time: Watch the marker readings update as you adjust element length
- Temperature drift monitoring: See how a crystal or filter shifts over time
- Before/after comparisons: Same marker position, different DUT
Troubleshooting
Section titled “Troubleshooting”Marker Readout Shows Wrong Units
Section titled “Marker Readout Shows Wrong Units”The marker displays values in the units of the active trace format. If you see dB when expecting ohms, check which trace is selected — tap the trace indicator to switch.
Marker Jumps When Changing Active Marker
Section titled “Marker Jumps When Changing Active Marker”Each marker has its own position. When you switch active markers, the readout changes to show that marker’s frequency. The jog wheel now moves the newly selected marker.
All Markers Disappeared
Section titled “All Markers Disappeared”Check MARKER > SELECT MARKER — markers may have been disabled with ALL OFF. Also verify the markers are within the current sweep range.